Multitrack
This tab allows you select the instruments:
| - | to be displayed/hidden in Multitrack display mode |
| - | to be printed out |
By default, all modules are displayed or printed out with tablature and/or notation according to the general screen mode that has been set. This sub-dialogue, however, allows you to specify a display/printout mode for particular modules. The options made here are saved with the *.tef file.
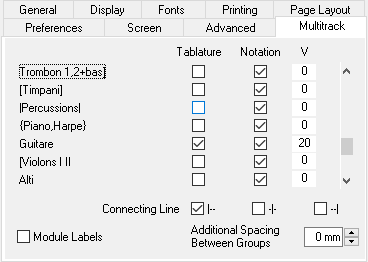
You can select tablature and/or notation or neither, if you wish. This allows you, for instance, to display/print out the notation for one instrument and the tablature for another. This can be very useful for a score containing both instrumental and vocal modules. Keep the [Ctrl] key pressed to select/unselect all the modules.
You can also in the field "V" specify a vertical space more or less after the module. This lets you adjust the space between instruments, or even superimpose the notation staff of two instrumental parts, for example to create a third voice.
The "Connecting Line" connects the various instrument parts with a vertical line. You can choose to display the connection line at the start of the system ( |-- ), between each measure ( -|- ) or at the end of the system ( --| ).
The following options concern printout only :
The module (instrument) names are not automatically included in the printout. If you wish to include these, the formatting command & l (i.e. lower case L) and & i (without intervening spaces, these have only been included for legibility) will have to be included in the header formatting string(s) in the {File | Options}>Page Layout tab. This will then display the module name (&i) at the far left (&l) of each row.
It should be noted that printout of any of the above multitrack formats will probably require adjustments in the spacing settings made in the {File | Options}>General tab. One basic setting can, however, be made directly in this dialog. The "Additional Spacing Between Groups" parameter allows you to increase the vertical space separating separate systems.
The "Module Labels" option concerns itself solely with display. It has three possible states. Checked, it allows the name of the modules to be displayed above their respective grids. In an indeterminate state, the module names are not displayed but the active module is highlighted using a slightly darker background. Unchecked, TablEdit simply displays the tuning of the current module in blue.
An accolade or brace can also be printed along the left edge of the notation staffs. Open the "Instrument" window and change the name of the top and bottom instrument by preceding the instrument names with "{" and "}" respectively. For instance:
Instrument 1: Guitar I change to {Guitar I
Instrument 2: Guitar II
Instrument 3: Guitar III change to Guitar III}
When opened in print preview or printed, an accolade will span the three staffs along the left edge. You can also display a bracket or a thick vertical line with respectively "[" and "]" or "|" and "|" ("pipe" character).
Silent Measures
TablEdit automatically prints out silent measures when:
| - | an instrumental part in a multi-instrument tablature contains several, consecutive, empty measures |
| - | the part is printed out separately. |
| - | the "Automatic Rests" display option and the "Fixed Width Measures" printing option are both disabled. |