Page Layout
This tab contains the page layout settings for margins, header/footer size and content, etc.
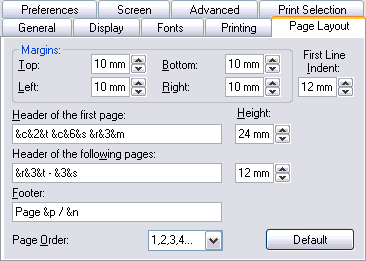
Top & Bottom margins
Defines the vertical space within which printed objects are printed. As a general rule of layout, the bottom margin should be slightly larger than the top margin.
Left & Right margins
Defines the horizontal space within which printed objects are printed.
Page order
This controls tablature printout using both sides of the paper. First, instruct TablEdit to print out only the odd-numbered pages ("1,--,3,-- ...") and print them out. Then, put the printed pages back into the feed tray of your printer (back to front), invert the left and right margin settings, if necessary, and print out only the even-numbered pages ("--,2,--,4 ...").
Indent
This option allows you to set the indent of the very first line of the score. To set the indent of the line following a line break, use the line break options.
Footer & Header Layout
By default, TablEdit prints the page number and the page count centered at the bottom of each page.
By default, TablEdit prints the title, the sub-title and any comments at the top of the first page with only the title and sub-title, in small characters, on the following pages. You can adapt this procedure to your own taste by simply re-defining the headers manually
To define headers and/or footers for each printed page, type the required text in the "Header" and "Footer" boxes along with the appropriate formatting codes. You can always restore the predefined values by clicking on [Default].
You can also use page macros to format the text and insert the title, sub-title, comments, etc...
You can add a page number offset (handy when putting together a book, for instance).
Formatting codes:
| &n | the total page count |
| &p | the current page number You can have TablEdit add or subtract a constant number of pages to/from the current page number or page count. This is very handy if, for example, you're preparing a book for publication. |
| &n-10 | (subtracts 10 from the total number of pages displayed) |
| &p+120 | (adds 120 to the current page number) |
| &f | the file name |
| &d-&D | the current date (&d for abbreviated form, &D for long form) |
| &h | the current time |
| &i | the module name (in multitrack mode, the module name can be printed out at the far left of each row). |
| &k | the capo position |
| &x[nn] | by default, the first item in the Text manager list. if "&xnn", the item #nn in the list. |
| &b | the designed bitmap (see below) |
| &l | text that follows this code is to be left justified |
| &r | text that follows this code is to be right justified (&R behaves |
| &R&L | behave as &r and &l on odd pages but the opposite on even pages |
| &c | text that follows this code is to be centered |
| &t | the title of the song |
| &s | the author (or sub-title) of the song |
| &m | the comments |
| &C | the copyright notice. If this macro is entered in the footer, it is applied to the first page only and ignored for the following pages. |
| &1 | text that follows this code is to be formatted with font #1 |
| &2 | text that follows this code is to be formatted with font #2 etc... |
Please note that the codes &r, &l and &c cause a carriage return in the header. This can, in some cases, be useful. For example the string "&cfirst &csecond &cthird" will give the following result:
first
second
third
To force a line break, type the sequence "\n", For example "&cfirst\nsecond\nthird" will give exactly the same result as above.
Adding a bitmapped graphic
If you wish, you can insert a bitmapped graphic in the header or footer of your tablature. Use the following procedure to do so:
| • | Create a monochrome bitmap in your Windows folder (usually C:\Windows). This may have any height but its width must be a multiple of 32. As an example you can use the file "banner.bmp" supplied with the program. |
| • | Enter the macro code "&b" in the header (or footer)definition field, followed immediately by the file name of your image (e.g. &bmylogo.bmp). |
Logo Layout
TablEdit offers tinkerers additional formatting options for logos:
First, the final letter of the *.bmp file containing the logo can be changed to "c" or "r" causing the logo to be centered or aligned to the right, respectively.
Secondly, you can cause the logo to print out in your printer resolution (much higher than screen resolution) by replacing the second letter of the *.bmp extension with an "n". The layout command line "&mylogo.bnc" would, for example, cause the logo to be printed in high resolution and centered.