Display
The "Display" tab allows you to define the display of chord diagrams, note stems, endings, repeats, etc. in your tablatures. The settings made here affect both the on-screen appearance and your printouts.
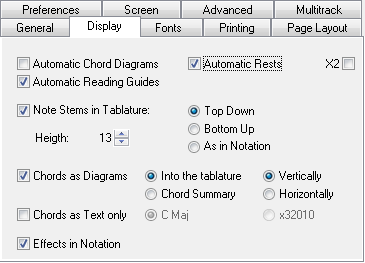
Auto Chord Diagrams
The chord positions used in an arrangement are directly related to the playability of the piece. Certain licks may require the use of specific, often unorthodox, chord shapes. TablEdit analyzes the fingerings in the tablature and attempts to recognize the chord positions it finds. If it succeeds, it automatically displays a chord diagram above the location concerned. TablEdit then attempts to identify the chord and, if successful, displays its name underneath the diagram. This may help you to rapidly determine the most convenient left hand fingering to use.
If you're not satisfied with the result, you can disable the option. In this case, automatic chord diagrams will neither be displayed on the screen nor included on your printouts.
Although TablEdit's automatic chord function is relatively advanced, it cannot always handle the positions necessary to a particular arrangement. In fact, by its very nature, an automatic computer algorithm cannot be expected to treat even common chords correctly under all possible circumstances. This isn't the fault of the programmer, it's just that the algorithm can only deduce chord positions from the notes actually entered by the user. If it only has two or three notes to work with, I can guarantee you that any program is going to end up showing an incorrect chord at least half the time. The same applies to the chord names assigned to various diagrams. Given the fact that any given three note combination (the minimum number of notes required to name a chord) will usually have at least two correct chord names there is also the problem of whether a barré chord is, for example, an A![]() or a G
or a G![]() (enharmonic chords).
(enharmonic chords).
There are two solutions to this problem. One is to create and name custom chords of your own and the other is to use custom chords which have been included in other tablatures or collected into custom chord catalogs. The "Chord Editor" in TablEdit, although not completely without fault from the user's point of view, provides you with a highly advanced tool for creating your own diagrams.
Clicking on an automatic chord diagram opens the "Chord Editor" dialog, allowing you to modify the diagram and add it to the list in the Chord Manager.
Reading Guides
This option controls whether the "reading guides" deduced from the "Reading List" are displayed or not. It has no effect on actual MIDI playback which will follow the entries of the Reading List in either case.
Automatic Rests
This option allows the display of the rests automatically deduced by TablEdit from the position and duration of the notes in each measure in the notation. These automatic rests will also be printed out in both the notation and the tablature if the "Rests in Tablature" option in the Printing options dialog is selected.
The "X2" option allows the management of automatic rests for two voices. Automatic rests highlight placement and duration errors when entering notes thus providing an effective method of verifying corrections within the score. If check marked, it will insert rests automatically for the upper (melody) and lower (bass) voices. To get the best results, you should force stems upward for the upper voice and stems downward for the lower voice. If the note stems have not been forced, the 3rd string open G (G1) is used to determine whether a rest is upper voice or lower voice.
Rests may also be entered manually.
Note stems
Controls the direction used for note stems in the tablature.
Top down
Causes all stems to be displayed downwards from the numbers in the tablature
Bottom up
Causes all stems to be displayed upwards from the numbers in the tablature
As in Notation
Causes the note stems in the tablature to be displayed with the same orientation as those in the stave. Thus, bass note stems will be displayed downwards and treble note stems will be displayed upwards. In this case, the letters indicating hammer-ons and pull-offs will not be displayed in the tablature. It will be left up to the reader to "deduce" the correct effect from the direction of play. This can, in some cases, be corrected by adjusting the direction of the ties between the notes (see "Hand" palette).
The choice may not be as straightforward as it might seem. On the one hand, having all the stems in one direction can, to some extent, cause timings to be obscured in more complex tablatures. On the other, the use of the "As in Notation" setting may pose greater demands concerning the positioning of elements such as text, custom chord diagrams, etc.
Stem direction in the standard notation is automatic but the stem for each, individual note can be modified manually (see Notation display)
The "Height" value allows to reduce the length of the stems in the tablature.
Note: In tablature, whole notes have no stem at all and half notes have an half stem. Pressing [shift]+[Y] will cause all notes in the tablature to be associated with a stem, even half and whole notes.
Chord Diagrams
Controls how custom chord diagrams are displayed and their placement on printouts. Please note that Custom Chord diagrams will not be included in printouts unless this item is selected!
If "Into the tablature" is selected, custom chord diagrams will be displayed in full above their point of insertion in the tablature both on-screen and on printouts.
If, on the other hand, "Chord Summary" is selected, only the chord name will be displayed above the insertion point in the tablature. The chord diagrams, themselves, will not be included anywhere within the on-screen display and will be included as a group, on the first page, before the tablature on printouts.
The orientation of the diagrams can be selected. Although displayed vertically by default, they can also be displayed horizontally.
Finally, you can choose to display chord or scale diagrams in color. Select the diagram marker (![]() or
or ![]() ) and press [C]. The color assigned to the diagram will be that which has been set in {File | Options}>Advanced>Colored Notes for the string on which the marker is located.
) and press [C]. The color assigned to the diagram will be that which has been set in {File | Options}>Advanced>Colored Notes for the string on which the marker is located.
Note: When the "Chord Diagrams" is disactivated, the chord diagrams are displayed, but "greyed out" on the screen to allow you to visualize and edit them, if necessary.
Chord as Text Only
This and the previous option are mutually exclusive. It allows you to display only the name (e.g. "C Maj") of the chord or its description in the format "x32010" (for the C Major chord).
Even if the "Chord Diagrams" option is checked, you can print out just the name of a given chord by creating an empty, but named, chord diagram.
Note: If the current instrument is an accordion, "Chord diagrams" and "Chord as Text Only" are replaced respectively by "Tablature with border" and "Hide Basses and Chords". The first option asks TablEdit to display the tablature with borders and the second one not to display in the notation stave the notes corresponding to the basses and left hand chords. These notes are anyway never printed in notation.
Effects in Notation
This allows the display, in the stave, of connecting marks (ties) between notes to which certain special effects (ringing notes, bends, etc.) have been applied.