Chord Manager
Selecting {Edit | Chord Manager...} or pressing [Ctrl]+[D] opens the first of related dialogs. The first one, illustrated here, is the Chord Manager, itself.
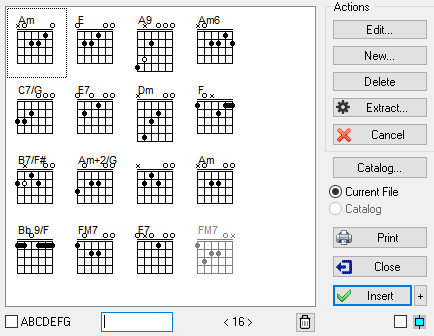
This contains a graphical representation of any Custom Chord diagrams you've created (or which have been created by someone else and distributed as a Chord Catalog (see below) and allows you to select one for insertion above the tablature. There are two kinds of chord diagrams you can insert into a TablEdit tablature: automatic and custom chord diagrams.
The Chord Manager deals only with custom chord diagrams. For the inclusion of automatic chord diagrams in both the on-screen display and on your printouts, see Display options. The other two dialogs belonging to the Chord Manager are the Chord Editor and the Chord Finder
Both [Edit...] and [New...] open the "Chord Editor" dialog. The only difference is that [Edit...] will only open the dialog if there is already at least one custom chord diagram included in the field at the left of the window. The diagram to be edited must, of course, first be selected by clicking on it. If you don't select a diagram first, the first diagram in the field will be opened automatically.
[New...] opens the editor with a blank chord grid displayed.
[Delete] removes the currently selected chord diagram from the Chord Manager window.
[Extract...] allows you to import custom chord diagrams existing in other *.tef files into the current tablature. Clicking on this button opens the standard file selector so that you can choose the file from which the diagrams are to be imported. All of the custom chord diagrams contained in the selected file will be imported and displayed in the Chord Manager window.
[Catalog...] allows the selection of a chord catalog file. Catalog files are standard TablEdit *.tef files containing only chord diagrams. They sometimes have a *.cat extension for easier identification.
Below the [Catalog...] button are two, small radio buttons marked "Current File" and "Catalog", respectively. Once a catalog file has been selected for the first time, both of these buttons will be active. They allow you to switch between display of the Custom Chord diagrams already included in the current tablature and those in the Custom Chord catalog you've selected. Chords selected and inserted into the tablature from the catalog are automatically added to the "Current File" display.
[Print] prints out all of the Custom Chords contained in the tablature or in the current chord catalog.
When printing chord sheets, page breaks can be forced by inserting blank diagrams (all strings marked "X") at the points where a page break is desired. For example, in order to insert a page break after a series of A chords, simply create an empty diagram labeled "Bazzz" to serve as a bookmark (this assumes, of course, that you're using the alphabetical sorting option). Such a blank diagram, without an assigned name, can also be used to force individual automatic chord diagrams out of the tablature if these have selected under {File | Options}>Display.
[Cancel] exits the dialog and cancel any change made in the Chord Manager list.
[Close] closes the dialog without inserting a diagram into the tablature. Any new diagrams that may have been created will, however, be stored in the chord diagram window.
[Insert] closes the dialog and inserts the currently selected chord diagram into the tablature at the cursor position. The small [+] button allows you to choose the basic position of the diagram (above the tablature, above the notation, below the tablature).
Select an empty line since an anchor point in the form of a small gray rectangle will be placed at the location you select, anchoring the chord in place above the tablature. Be warned, however, that the anchor will replace any number occupying the same space in both the screen display and on your printouts. Once the Manager has then been opened, simply click on the diagram you want to insert and then on the button marked [Insert]. The Manager dialog is then automatically closed and the selected chord is displayed above the cursor position.
The check box marked "ABCDEFG" at the lower left of the dialog allows you to display the chord diagrams in the window either in their order of entry (default, unchecked) or alphabetically by chord name. If this option is not checked, keeping the [shift] key pressed while using the arrow keys allows you to change the chord diagram order.
The edit field beside the "ABCDEFG" check box allows you to filter the chord diagrams.
The eraser ![]() allows the removal of unused chord diagrams from the Chord Manager window. These diagrams are greyed out in the list.
allows the removal of unused chord diagrams from the Chord Manager window. These diagrams are greyed out in the list.
The check box ![]() turns the dialog box into a non-modal window. That is to say that you can navigate in the score and change the cursor position. In this case, the Insert button does not close the window.
turns the dialog box into a non-modal window. That is to say that you can navigate in the score and change the cursor position. In this case, the Insert button does not close the window.
By default, chord diagrams are displayed and printed using the color and the font defined for the "Chord diagrams" font. You can change the color by highlighting the diagram's anchor point and pressing [c]. The color will then be changed to that corresponding to the string number in the color palette for "Print Colored Notes". The size of the chord diagrams is bound to the "Chord Diagrams" font size. The position of the diagram can be fine-tuned with the Format command.
Note: The Chord Manager dialog can be resized.