View Menu
 This provides easy menu access to the various "View" scales which control the display width of measures on your monitor screen. It also allows you to select which palettes and other tools you wish to have displayed in your working area.
Scale to 1/8th...1/64th Notes
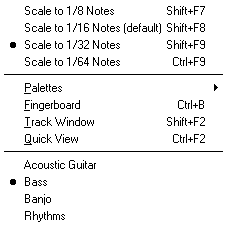
There are four viewing scales available from the {View} menu:
| Scale to 1/8 Notes |
| Scale to 1/16 Notes (default) |
| Scale to 1/32 Notes |
| Scale to 1/64th Notes |
The scales are based on the interval of the notes so that viewing and editing (with TablEdit Editor) can be done more easily. For example, you will have difficulty viewing 1/32nd notes when shown in the "Scale to 1/8 Notes" view, but selecting "Scale to 1/32 Notes" will allow you to view 1/32nd notes very easily.
The first three of these viewing modes can be reached via keyboard shortcuts ([shift]+[F7...9]). The last, 1/64th mode, can only be reached from the {View} menu or by clicking on the small icon at the extreme left end of the ruler.
The four items in this section of the menu represent the "View" modes available to you. 1/8th note mode will give you the maximum number of measures on your screen but can be a little tight to work with as the various symbols may have a tendency to overlap. 1/16th note mode (which is the default setting) displays fewer measures on the screen but, at the same time, gives you a little more elbow room. For very detailed work requiring, for example, 1/32nd note septuplets you must use 1/64th Note mode. This mode is available only from the menu or the ruler. The first three modes mentioned above can also be accessed via the keyboard shortcuts [F7...F9].
Palettes
TablEdit provides you with a series of "Palettes" giving you on-screen access to a wide variety of the features of the program.
This command opens a submenu that allows you to show or hide the different palettes available. You can also use the command Options>Screen.
{View>Fingerboard} opens an auxilliary window which is by default displayed along the right-hand side of the main screen. This represents the fingerboard (fretboard) of the instrument. You can have it displayed horizontally by anchoring its window at either the top or bottom of the main screen or by selecting the appropriate screen in Options>Screen. You can toggle the display on and off using the keyboard shortcut [Ctrl]+[B]. To modify the width of the fingerboard if it's floating free of the main window, select one of its borders and drag it to re-size it to your desired size.
While MIDI playback, TablEdit displays fingerings on the fret board in real time.
When the MIDI playback is not in progress, TablEdit displays the fingerings used within the current selection (if you have selected multiple notes).
If the instrument is a concertina or an accordion, TablEdit displays the keyboard of the instrument.
Note: If you dock the fingerboard onto the left side of the screen, the display will show a left handed instrument.
This window displays the measures of the various modules as rows of small buttons. These, in turn, contain a colored rectangle if the measure represented contains at least one note.
Currently selected measures are shown as pressed buttons.
Clicking on one of these buttons will immediately move the screen display to the measure and module it represents.
The module names are displayed to the left: in green when the module is audible or in red when it's been muted. You can mute or unmute each module by simply clicking on it's name. If you press [Ctrl] as you click, all the other instruments are muted
Complete measures, that is to say those whose cumulative note and rest values correspond exactly to the rhythmic signature, are displayed in green. Incomplete measures are shown in yellow and measures exceeding the signatures length are shown in red.
This command opens a secondary window that displays the current and adjacent measures as they will be printed.
This allows you:
| - | to test instantaneously the result of the changes you make to your tablature. |
| - | to view and play the tablature and/or standard notation in a clean and uncluttered window. |
[Ctrl]+[F2] opens a new Quick View window without scrollbars or menus. This is the cleanest of playback windows and when used with a video capture application (such as CamStudio) makes for a very nice video that can be shared on YouTube or included in your own instructional materials. [Ctrl]+[F2] a second time dismisses the Quick View window.
The Quick View window can be floating or docked. Dock it by dragging the title bar at the top of the Quick View window to the edge of the primary TablEdit window, or by double clicking on the title bar across the top of the window. Undock it by double clicking on the “handle” to the left of the docked Quick View window or by dragging it with the [Ctrl] key pressed.
Use the two blue triangles on the left to move the system. While pressing [Maj], the offset changes by increments of 10 (of 100 with [Ctrl]).
The [F2] key hides the ruler, markers, floating palettes and colored notes. Pressing [F2] again returns the hidden items to view.
Capture mode
If the clean mode has been activated with [F2], resizing the floating Quick View window (or the TablEdit window, itself) will force a 16:9 aspect ratio.
In clean mode, when you first open the Quick View window, it displays the Title Screen which draws its information directly from the Title Information dialog using the fonts defined in Options->Fonts. When you start the MIDI playback, the title screen will go away and the scrolling playback will begin with a grey triangle marking the position of the playback. When the playback ends, the title screen returns.
Click anywhere in the Quick View to change the position of the TablEdit logo or to make it disappear.
The Module List
The last item of this menu is a list of all the modules in the current tablature. The module names correspond, by default, to the instrument selected for each module. This can be altered to any name of your choice (e.g. "First guitar", "Second guitar", etc.) in {Score | Instrument...}.