Screen
The items in this tab determine a number of the program (as opposed to tablature) elements displayed on your screen.
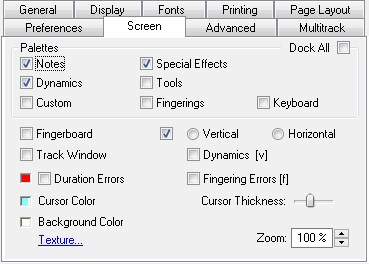
Palettes
The upper portion of the dialog allows you to select which palettes, if any, you want to have open in the working window. These elements can also be selected from {Display}>Palettes. Click here for more detailed information about the individual palettes.
The "Dock All" option causes all the palettes to be docked. It is recommended to activate this option if you are running TablEdit with a Mac or Linux emulation (e.g. CrossOver by www.codeweavers.com). It doesn't take effect before the next session with TablEdit.
Fingerboard
Allows the display of a graphical fretboard on the screen. Click here for more information.
Track Window
Allows the display of a "Track Window" at the bottom of the screen. Click here for more information.
Duration Errors
This option causes the following to be displayed in a different color in the tablature:
| • | any note whose assigned duration is impossible, e.g. a 1/4 note followed by another note on the same string at an interval of an 1/8th note |
| • | 1/4 notes or greater entered on an off-beat |
Duration errors can be displayed in the color of your choice in the tablature. The color is set to red by default but can be changed by clicking on the colored box. Doing so will open the standard color selection palette containing the basic colors for the color resolution you are currently using (i.e. 16 colors, High Color, True Color). You can select from any of these colors. You may also, if you wish, define your own custom colors by clicking on [Define Custom Colors].
If this option is selected, notes whose stems have been forced one way or another or whose scale alteration has been changed manually are also displayed in color. Notes whose stems have been forced downwards are displayed in blue, those whose stems have been forced upwards are displayed in red and notes whose alteration have been set manually are displayed in yellow. This is a valuable tool for proofreading tablatures.
Cursor Color
This, as you may have guessed, allows you to change the color of the cursor. This allows you to select a color other than cyan blue. The line that is displayed during MIDI playback and the cursor border is derived from this color. It is 50% darker.
The procedure for changing the color is the same as that described above under "Duration Errors".
Cursor Thickness
You can change the thickness of the scrolling cursor during MIDI playback.
Background Color
This allows you to change the background color used for TablEdit's working window from the default white. Other than the basic question of personal taste, this can be useful if you find that the standard white background results in too much screen glare for your eyes.
The procedure is the same as described above under "Duration Errors".
Texture
[Texture] allows you to select an image in *.bmp format to use as a background. Care should be taken with your choice of image. You may have to adjust the basic background color so that the display background for characters doesn't clash or get obscured by the image color. This image will not be included on printouts.
Dynamics
Causes the dynamic level of each note to be displayed next to it. This allows you to "fine tune" the sound produced by a tablature on MIDI playback. This is very important when producing what is referred to as a "Performance" tablature which is one step up from a "Note-for-note" tablature as it's concerned with the playback quality as well as the accuracy of the transcription, itself. The display of dynamics can also be toggled on/off from the keyboard by pressing [V].
Fingering Errors
Stringed instruments
When TablEdit encounters a chord implying an impossible extension of the fingers, this will be enclosed by a thick, red line.
Accordion
TablEdit checks the agreement between basses and chords and the bellows direction (Push/Pull) specified for melody notes. It also warns you when two notes requiring opposite bellows directions are defined as being played simultaneously.
Zoom
This field allows you to change the zoom factor of the edit window.
The controls at the bottom right of the screen allow you to perform the same operation with the mouse. If your computer has a trackpad, you can reduce or enlarge the zoom factor by pinching or spreading two fingers. Alternatively, hold down the [Ctrl] key and use the mouse wheel.