Edit Menu
This menu contains general editing controls designed to save you time when working with TablEdit. The {Insert} sub-menu contains controls dealing with various special elements of your score. This includes the insertion of musical symbols, percussion events, crescendos/decrescendos, etc.
Important : In order to learn how to use TablEdit's workspace, insert notes, rests, modify and manipulate existing notes, etc… please consult the "Note Entry and Editing" section of the tutorial.
Undo/Redo
These two menu items allow you to correct any entry errors you may have made.
Selecting {Edit | Redo} (or using the keyboard shortcut [Ctrl]+[Y]) will reverse the effects of any "Undo" operations that may have been performed. Again, this process is performed step-by-step.
Cut
This deletes the selected note(s) from the tablature and copies them to the clipboard. The operation can also be done using the keyboard shortcut [Ctrl]+[X]. The selection can then be re-inserted at a location of your choice by placing the cursor at the new location and selecting either {Edit | Paste} (see below) or using the keyboard shortcut [Ctrl]+[V].
Copy
This performs essentially the same operation as "Cut" except that the selected note(s) aren't deleted from their original location. The shortcut for this operation is [Ctrl]+[C].
Paste
This inserts notes copied to the clipboard using either "Cut" or "Copy" at the cursor location. The keyboard shortcut for this is [Ctrl]+[V]. Any already existing content at the insertion point will be deleted.
This item leads to a sub-menu containing two menu items:
Select All
Selects all the contents of the current module.
Find and select
The dialog displays a list the various items used in the current module of the score. By checking "All modules", you can display statistics for the entire partition.
The Find button locates the first occurrence of the selected item type, then the next one and so on....
The Select button selects all of the items of the selected type (or within the current selection if there is is a multiple measures selection).
When you close the dialog the items remain selected and you can apply to them any action you want (copy or delete them, change their vertical position, etc...)
Note:
When you open the "Find and Select" dialog while holding down the [shift] key from the menu command, the dialog box also gives you the possibility to view the inner coding of the currently selected item and to modify it. This possibility exists only in the registered version.
Correct
This sub-menu gives access to functions which allow you to make bulk corrections to the notes included in the current selection.
This function has its principal use in connection with importing external file types, especially MIDI files. Its effect is to align a selected note or series of notes with the nearest note of the selected duration. If, for instance, you've imported a MIDI file which contains a "roll", this will usually show up as a series of 1/64th notes spread out over a space equivalent to a 1/4 note or an 1/8th note.
| Select the note(s) to be aligned, |
| Press [I] or select the "Quantize Notes..." command from the menu. If you have chosen the menu command, you will be asked to specify note duration to use as alignment value. Otherwise, the previously selected value will be used silently. |
Duration errors
This function works in conjunction with the "Duration errors" screen option. TablEdit corrects notes in error by reducing their duration or by creating tied notes where desirable. The image below shows how the duration errors (in red in the tablature) are corrected.
Note that a quarter note on the upbeat is not reported as a duration error but that TablEdit corrects it by creating a tied note. To avoid the correction, simply exclude the notes you do not wish to modify from the extended selection by creating a multiple selection.
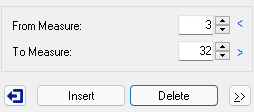
This function works in conjunction with the "Automatic rests" display option. TablEdit automatically corrects incomplete bars, either by increasing the duration of notes and rests, or by creating tied notes or rests. To prevent a tied note from being created, you must first insert a rest. For best results, you should use the "X2" option and explicitly assign each note to the voice to which it belongs. The image below shows how the automatic rests (pastel color) are converted.
The action is applied to the currently selected measures.
Fingering Errors
This function works in conjunction with the "Fingering Errors" screen option. It applies only to the current position. The fingerings will be adjusted so that the chords are playable. It is particularly useful in the case of a PSG.
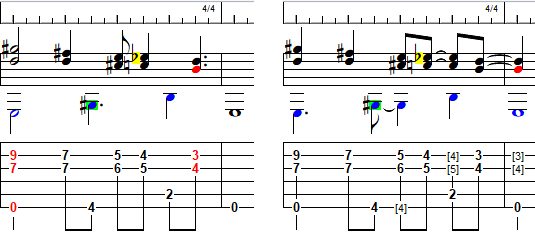
To delete measures
Simply enter the number of the first measure to be removed into the "From measure:" field and the number of the last measure to be removed in the "To measure:" field. Press the "Delete" button.
Notes: A score must contain at least one measure.
If the current measure is empty, the [Delete] key will delete it.
To insert measures
The dialog allows you to insert blank measures at the location of your choice. Simply select the measures that will be shifted to the right after the insertion. Press the "Insert" button.
Notes: A score may not contain more than 1024 measures 4/4.
To insert a measure before the current measure, press the [Insert] key. To append a measure at the end of the score, just go to the last measure and press [Tab] or [![]() ].
].
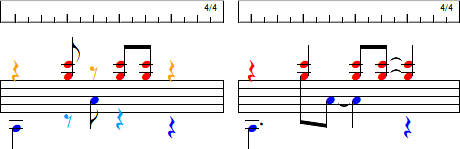
To copy or to cut (move) measures
Press the ">>" button. The dialog box dynamically changes :
Enter the range of measures you wish to copy and at which point you wish to paste them. Then press [Copy] to duplicate the measures or [Cut] to move them at the desired location.
The "Copy" button copies the selected measures to the measure indicated in "To measure:", creating three new measures to accommodate them. Thus, in the example, the former measure 10 now becomes measure 13 while the copied measures are applied to measures 10 to 12.
The "Cut" button moves the copied measures to the position indicated in "To measure:". In the example above, the copied measures become measures 7 to 9.
If the "Replace" option is selected TablEdit copies the selected measures directly to the measure indicated in "To measure:", replacing the contents of a number of measures equivalent to the number of measures copied. In this case, a copy of measures 2 to 4 will replace the contents of measures 10 to 12.
Note: Using the keyboard shortcut [Ctrl]+[Insert] without first marking a block copies only the measure containing the cursor but does have the effect of marking the measure as a block and copying it to the clipboard in a single operation.
The dropdown list at the bottom allows you to select from the currently open scores, the one in which the copied measures should be pasted. The current tablature is highlighted in the list with a ">" prefix. When the source and destination scores are different, only the single copy operation is available.
[Close] - simply closes the dialog.
TablEdit allows you to include a maximum of 512 different text items, 512 characters (maximum) each in length to your tablatures. These could, for example, include:
| • | song lyrics |
| • | chords names |
| • | section headings |
| • | etc. |
To insert a text, place the cursor at the desired location in the tablature and select {Edit | Text Manager...} or use the keyboard shortcut [Ctrl]+[T].
The Chord Manager is one of the most powerful features in TablEdit. It lets you create or edit Custom Chord diagrams for inclusion in your tablatures, find particular chord shapes according to the notes they contain and much more.
This item leads to a sub-menu containing a list of items which can be inserted into your scores to allow detailed control over both their appearance and the way they sound when played back.
This command allows you to set the display attributes of the elements selected in the tablature, whether notes, rests or elements other than notes (texts, chord diagrams etc...).