Insert
This is the sub-menu which is displayed when you select {Edit | Insert...}. Most of these items lead to specialized dialogs, the functions of which are described below.
Many of these functions are important in the creation of so-called "performance" tablatures as they allow the insertion of real-time changes during playback.
When a scale has been entered into the tablature, this function allows the display of a diagram showing the finger pattern. The function analyzes the contents of the measure from the insertion point of the diagram to the end of the measure or until a new such diagram is inserted, whichever occurs first. However, you can set the range to consider by performing an extensive selection before inserting the scale diagram. TablEdit calculates the length of the range according to the length of the extended selection.
To delete or to move the scale diagram, select its ![]() anchor.
anchor.
This opens a simple dialog containing a field displaying the general tempo set for the current tablature.
Entering a new tempo setting and exiting the dialog by clicking on [OK] inserts a tempo change marker ![]() above the tablature.
above the tablature.
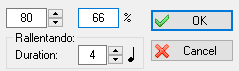
The "Duration" field allows a smooth transition from the old to the new tempo ("Accelerando" or "Rallentando" in case of decrease). For example to change from 120 BPM to 80 BPM in a single 4/4 measure, simply enter a new tempo of 80 with a duration of four 1/4 notes.
The area on the left shows the relative change from the basic tempo in percent. The text field can be edited and, if modified, the new absolute tempo is displayed.
The tempo change will remain in effect until a new tempo change is inserted or until the end of the piece.
To delete or to edit a tempo change, first select its ![]() anchor.
anchor.
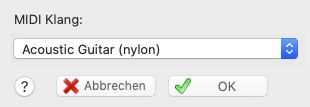
This allows you to insert a temporary change of MIDI voice (instrument) within a tablature.
After you've selected the new voice to use and clicked on [OK], a ![]() marker (anchor point) is inserted at the cursor position. When TablEdit gets to the selected point during playback it will automatically switch over to the instrument you've selected. The voice change remains in effect until TablEdit encounters a new voice change marker or the end of the tablature.
marker (anchor point) is inserted at the cursor position. When TablEdit gets to the selected point during playback it will automatically switch over to the instrument you've selected. The voice change remains in effect until TablEdit encounters a new voice change marker or the end of the tablature.
If your sound card allows you to access alternative "sound banks" (MIDI instrument definitions), TablEdit will allow you to designate the program bank number in accordance with the card's documentation. The number is displayed hexadecimally after the main program number.
The bank numbers consist of a two byte code. If you wish to define a bank number, you have to select a hexadecimal number for the Least Significant Byte (LSB) and/or the Most Significant Byte (MSB). Suppose, for example, that the documentation for your sound card tells you that, in order to achieve a powerful electric guitar sound based on the Distortion guitar (31) voice, you should activate bank 16 (10H). You would then select 0x10 in the right-hand list (LSB). If that doesn't produce the desired change, try selecting 0x10 in the left-hand list (MSB). There doesn't seem to be a universal standard for which bytes are used so it's impossible for us to know which standard (MSB or LSB) each sound card manufacturer uses.
[Play] allows you to test the results of your settings.
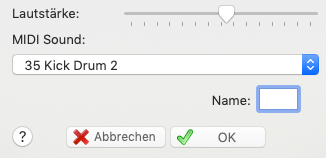
This allows the insertion of specific percussion events. Use the slider to set the desired volume level for the event in the field at the top of the dialog and select the event type (patch) from the combo box.
Clicking on [OK] enters the event at the cursor position. The ![]() anchor can be placed on any string but the same care should be taken with the placement as with any other anchor point. The event will also be marked with a diamond-shaped icon directly above the tablature grid. For extensive, repetitive percussion patterns, we suggest that you create a separate "Drum tablature" module.
anchor can be placed on any string but the same care should be taken with the placement as with any other anchor point. The event will also be marked with a diamond-shaped icon directly above the tablature grid. For extensive, repetitive percussion patterns, we suggest that you create a separate "Drum tablature" module.
The "Character" field below allows you to choose a letter that will be displayed in the tablature instead of the diamond-shaped icon. Please note: if you prefer no display at all you just have to enter a space.
This function allows you to insert an arch between two notes. The start is taken from the nearest note. The end point is determinated by the duration of the legato. Indeed, TablEdit takes the first note found at the end point.
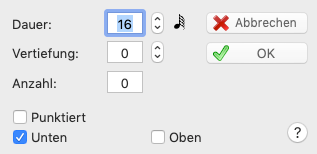
The dialog box allows you to define the legato duration, the arch amplitude and eventually a number (from 1 to 15). This number allows you to represent and to play a tuplet that TablEdit doesn't manage naturally. With this exception, the legato normally have no audible effect except for the tabs for violin or flute.
By default the arch is oriented downward. To invert the orientation, select the legato marker and type [A]. To restore the downward orientation type [E] or [Z].
The vertical position of the arch can be finely adjusted by placing the cursor on it's ![]() anchor point in the tablature and pressing [+] or [-].
anchor point in the tablature and pressing [+] or [-].
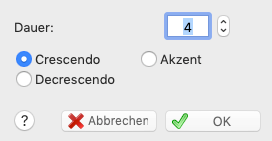
MIDI velocities (dynamics) are coded as a number between 0 and 127. In TablEdit, the dynamic value of notes can be adjusted only in 16 step intervals. Thus, from 127 (fff) the program dropped directly to 111 (ff) and so on.
The Crescendo/Decrescendo feature allows the use of progressive intermediary values. If, for example, you wish to make a smooth transition from f to fff in a single 4/4 measure, simply mark all of the notes of first measure as f and the following measure (or, at least, the first note of the following measure) as fff. Then enter a crescendo with a duration of sixteen 1/16th notes (enter the figure "16" in the editable field labeled " 1/16th notes") and that's it. TablEdit will augment the dynamic level progressively whether or not there are actually any notes to be played. But be careful! As usual, TablEdit exercises a minimum of control. This means that it's quite possible to enter a crescendo on notes already set to fff. This, of course, means that there won't be any noticeable effect. Worse, if TablEdit encounters a single note between the beginning and the end of the crescendo that's already set to fff, the effect will be nullified. The reverse is true in the case of decrescendos.
The graphical symbol is placed above either the notation or the tablature. As with texts, symbols placed relative to the notation or the tablature appear on printouts only if the system relative to which they are assigned is included in the printout. Select the ![]() marker to edit the Crescendo/Decrescendo settings.
marker to edit the Crescendo/Decrescendo settings.
This dialog gives you the ability to insert an "Accent" marker. In contrast to the crescendo/decrescendo, which is progressive in nature, the accent allows instantaneous variation of the intensity of individual notes. During MIDI playback, all the notes in the designated position have their intensity augmented by the value set in the editing field. For example, for a note corresponding to a value of 63 with an accent value of 8, TablEdit would play a note with a velocity of 71. TablEdit will also display a '>' symbol above the affected position. The position of this symbol can be adjusted in the same fashion as the drescendo/decrescendo marking.
See also the related discussion in the "Using dynamics" section of the tutorial.
Allows temporary changes of the basic syncopation value selected in {MIDI | MIDI Options...} dialog. The ![]() anchor point is placed at the cursor location. You may want to anticipate the change by placing the anchor point one step to the left of the point where you actually want it to take effect. The change remains in effect until a new syncopation change is inserted or until playback reaches the end of the tablature.
anchor point is placed at the cursor location. You may want to anticipate the change by placing the anchor point one step to the left of the point where you actually want it to take effect. The change remains in effect until a new syncopation change is inserted or until playback reaches the end of the tablature.

The dialog allows you insert specialized musical symbols such as trills, mordents, fermata and emphasis points in the score. To position the selected symbol, use the Format dialog.
As in the case of text insertions, symbols attached to the stave will only be displayed and printed out if the stave is included (the same, of course, is true as concerns symbols attached to the tablature).
Note that these symbols are only graphical in nature and have no effect whatsoever on playback. The only exception is the fermata. If you select the anchor point ![]() and press the [d] or [D] key, you can choose how long the note closest to the marker should be suspended. The [d] key lengthens this time, while the [D] key shortens it. Normally, the marker is positioned at the same position as the note to be impacted, but in the event of impossibility or ambiguity it can be placed immediately to the right of the note, at an odd position.
and press the [d] or [D] key, you can choose how long the note closest to the marker should be suspended. The [d] key lengthens this time, while the [D] key shortens it. Normally, the marker is positioned at the same position as the note to be impacted, but in the event of impossibility or ambiguity it can be placed immediately to the right of the note, at an odd position.
This function also allows indirect verification of whether or not the latest version of the TablEdit True Type font "Tef265_2.ttf" has been correctly installed on your system. If it isn't, simply install the latest version of the font file from the tabled32.exe file.
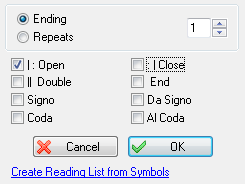
This dialog allows you to force the display of repeat signs, da Signo markings and section endings. It can also be opened from the corresponding option in the "Tools" palette.
Signs inserted in this manner are strictly graphical in nature and have no effect whatsoever on the order of MIDI playback. This one is strictly controlled by the entries made in the Reading List.This is primarily intended for those wishing to create personalized printouts. If you intend to use this feature, we suggest that the "Reading Guides" option in {File | Options}>Display be turned off.
Last, but not least, you can choose to convert repetition and ending markers manually inserted into the tablature into a Reading List by clicking on the link "Create Reading List from Symbols".
Ending bracket : How to span more than one measure?
You have to use text macros to span the additional measures
| 1. | Add "%barchord:" at the end of ending measure to span to the next measure |
| 2. | Add "%barchord:" at the beginning of the next measure to span the entire measure |
| 3. | Add "%barchord:15" at the beginning of the final measure to span almost to the end of the last measure with a downward line at the end. |