The Palette
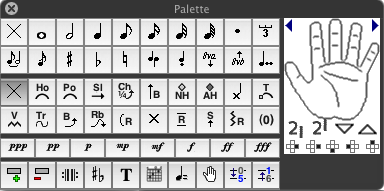
The master palette give you direct access to a wide variety of the features of the program, thus letting you avoid having to go into the menus for each operation you want to perform. The six sub-palettes of the master palette are:
The master palette can be moved around and presented horizontally or vertically. Although the initial display is, by default, vertical, the palette can also be displayed horizontally by simply clicking {View}{Palette} a second time. This operation can also be performed using the keyboard shortcut [![]() ]+[
]+[![]() ]+[B]. This will cycle the display through vertical to horizontal to no display.
]+[B]. This will cycle the display through vertical to horizontal to no display.
Several of the palette illustrations below are of the "click on me for information" type.
Many of the editing operations described below can be applied to more than just one note at a time using block operations (a.k.a. "extended selections").
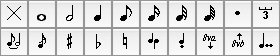
The "Notes" palette contains controls relating to note duration, manual configuration of accidentals, tied notes and stem direction. These settings can also be made directly from the keyboard. The currently selected note duration is displayed as a pressed button. The duration value of the currently selected note is displayed with a purple border.
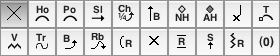
This palette provides mouse access to the most commonly used special effects (note that several of these effects also have keyboard shortcuts). Keep in mind that this palette only contains the most common effects. To access all of TablEdit's special effects, or to combine effects, you have to use {Note}{Special effects...}. The currently selected special effect is displayed as a pressed button.
When the cursor is located directly on a note, any special effect that has previously been applied to that note is displayed with a purple border.
![]()
These settings affect the relative volume of each of the notes of the tablature. These differences in volume are reflected during MIDI playback and can be used to create a more life-like sound. The button corresponding to the dynamic value of the currently selected note is displayed with a purple border.
![]()
This palette contains various editing tools allowing you to edit global settings, insert elements such as text and custom chord diagrams, access various dialogs, move notes across the strings and Undo and Redo your latest editing actions.
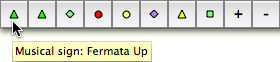
The 10 buttons of the palette are programmable. To configure them, select an item in the tablature and press the button in the palette while holding the [Ctrl] key. So when you highlight the marker on the tab for the item you want, simply use [Ctrl]+[click] to make your new customizable button appear (programmed now to that last anchor/function). As soon as the button is configured, a graphic corresponding to the item is displayed and allows you to insert this one where you want and as many times as you like.
You can as well add an additional descriptive text that will be displayed in the tooltip. Just press the button in the palette while holding the [![]() ] key. In the example above, the text "Fermata Up" has been entered. The same procedure applies to reprogramming or renaming a defined button.
] key. In the example above, the text "Fermata Up" has been entered. The same procedure applies to reprogramming or renaming a defined button.
You can also assign a character to the button. In this case, the cursor must be positioned on an empty place. Press and hold the [![]() ] key while clicking the button. In the dialog box, enter the character immediately followed by the explanatory text, for example "+Increase element". This allows you to emulate the [+] keystroke without using the keyboard. This allows you to get most keyboard shortcuts with the mouse.
] key while clicking the button. In the dialog box, enter the character immediately followed by the explanatory text, for example "+Increase element". This allows you to emulate the [+] keystroke without using the keyboard. This allows you to get most keyboard shortcuts with the mouse.
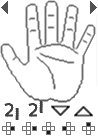
Officially called the "Fingerings" palette, this is, for obvious reasons, just as often referred to as the "Hand" palette. It allows the entry of left and right hand fingering indications as well as pick direction indicators. Thus, it provides the basic features found in {Note}{Pick strokes & Fingerings...}.
Clicking on the fingers of the hand attaches the corresponding fingering indicator to the note beneath the cursor.
Clicking with the left-hand mouse button enters a number enclosed in a circle to indicate a left hand fingering while clicking with the right-hand mouse button enters a free-standing letter to indicate a right hand fingering. Since different users may be used to different standards as to which letters are used to indicate these right hand fingerings, these can be configured to individual taste in {TablEdit}{Preferences}>Preferences.
At the bottom of the palette you'll find a double row of small symbols. On the first row, the two on the left are used to insert alternative right hand markings while the two on the right let you insert pick direction indicators. The items of the second row allow to put the left hand finger number in the notation and to adjust the position of this number. From left to right: D (Default right to the note) R (right) B (below) L (left) A (above).
At the top of the palette the button < and > allow to go back to the previous or to jump to the next note.
Clicking in the palm of the hand deletes all previously inserted fingering indicators.
The hand palette shows dynamically the strokes and fingerings attached to the selected note or marker.