Notation Display
Hidden Notes
For a note to be displayed in the tablature but not in the stave (in order, for instance, to emphasize the melody), select the note(s) concerned and press [D]. In order to make them visible again, re-select them and press [N] or [D] again.
Note heads
To offset the head of a note towards the right or left, select the note and press [O] (right) or [![]() ]+[O] (left). This feature is useful in connection with chords. In order to eliminate the offset, re-select the note and press [N] or [O] again. The same procedure applies to the rests.
]+[O] (left). This feature is useful in connection with chords. In order to eliminate the offset, re-select the note and press [N] or [O] again. The same procedure applies to the rests.
If the note stem has been forced upwards or downwards, this feature also moves the stem.
Accidentals
You can adjust the horizontal alignment of accidentals by using a special offset marker:
| place the cursor : |
| to reposition one forced accidental, at a 1/64th note interval after the note to which the accidental belongs. |
| to reposition all accidentals, whether automatic or forced, directly on the position of the chord concerned. |
| press [w] to insert the offset marker |
| use [<] and [>] to reposition the accidental(s). |
Note: A left-hand fingering placed to the left of the note automatically shifts all accidentals to the left.
Note stem orientation in the musical stave is determined automatically by a test of the pitch of the note to be displayed. The parameters for this test can be modified by simply adjusting the value of "Upward Note Stem Default" in {TablEdit}{Preferences}>Preferences. The default setting is that the stems for notes from >B3 (B in the first octave according to the American notation system or the open second string of a guitar in standard tuning) and above should automatically be turned upwards. Guitarists regularly working in higher positions on the fretboard may prefer to set this to >G3. No setting, however, will be accurate 100% of the time.
How to obtain the correct orientation of stems for monophonic instruments
The default approach is suitable for polyphonic instruments like guitar but not for monophonic instruments like flute, violin etc. To reverse the orientation of stems for monophonic instruments, there are two ways :
|
You can also choose to force a particular stem direction for individual notes by selecting the note(s) to be treated and pressing [A] to force the stem(s) upwards or [Z] to force the stem(s) downwards. In order to return the note stem(s) to the automatically determined direction, re-select and press [E]. The direction can also be reversed from the "Notes" palette.
Note stem orientation in the stave does not affect the corresponding orientation in the tablature, These are set globally in {TablEdit}{Preferences}>Preferences, unless the "As in Notation" option has been selected under {TablEdit}{Preferences}>Display.
It's possible to remove the note stems by selecting the note(s) to be modified and pressing [ ! ].
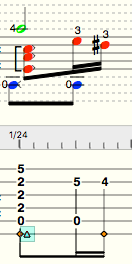
In order to adjust the height of the note stems and the orientation of the beams, place the cursor beneath the stem to be adjusted and enter [ | ] (N.b. this is referred to as the "pipe" character ([![]() ]+[
]+[![]() ]+[L]) and is not to be confused with the lower case L). This will enter a
]+[L]) and is not to be confused with the lower case L). This will enter a ![]() marker at the cursor location. The first marker of a given beat will be used to adjust the height of the first note stem and of the corresponding beam. A second marker within the same beat will be used to adjust the height of the final stem and, thus, the slope of the beam. The actual adjustment is performed by placing the cursor on the markers and pressing [NumPad +/-].
marker at the cursor location. The first marker of a given beat will be used to adjust the height of the first note stem and of the corresponding beam. A second marker within the same beat will be used to adjust the height of the final stem and, thus, the slope of the beam. The actual adjustment is performed by placing the cursor on the markers and pressing [NumPad +/-].
As with "beam breaks", it's possible to designate markers as belonging to either the upper or lower voice beam with [A], [Z] or [E]. For example select the marker in question and press [Z] to assign it to the lower voice beam. The marker becomes blue ![]() .
.
|
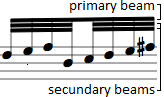
TablEdit automatically creates beams between notes that should be connected. Such beams can, however, be inhibited by inserting a beam break marker above or below the note which shouldn't be linked to the following note. Simply place the cursor at the appropriate location in the tablature and press [X]. If you wish to re-establish the beam, simply delete the In case of multiple beams (for example in the case of 16th or 32nd note beams), the primary beam should remain unbroken but the secondary beams may be broken by inserting a break marker and pressing [ ! ]. This allows to divide the grouping into smaller units :
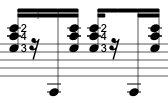
The use of rests with secondary beam break [ / ] allows to display truncated secondary beams. In the following example, the rest of the first group is not modified :
|
 .
.Depending on the orientation of certain note stems, TablEdit can display double beams, simple or composed. In the case of double beams, beam breaks are applied to one or the other of the two voices (default is to the upper voice). In order to designate the affected voice, simply select the beam break marker and press [A], [Z] or [E] in the same way as you would apply these to a normal note.
Beam breaks do not normally affect the tablature unless you instruct TablEdit to the contrary by placing the cursor on the marker and hitting [T]. Note that this function doesn't work if the option "As in notation" is active.
To exclude a note from beaming, simply select the note then type [X].
It is possible to create inverted stems and beams starting from the same note using rests whose velocity was set to "pp". TablEdit does not display the helper rest itself in the tablature or in the notation but it will show its stem and beam. You can then adjust the vertical position of the invisible rest so that it coincides exactly with the notes.
For example: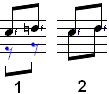 The same trick can be used for single flagged notes:
  or for quarter notes:
You can create a helper rest easily by selecting the note and typing [ | ].
TablEdit displays systematically the slurs of tied notes in the standard notation. By default TablEdit places the curve ties in the opposite direction of the note stems. To change the default orientation of the curve, select the tied note and press [L].
If the "Effects in Notation" option has been selected under {TablEdit}{Preferences}>Display, TablEdit displays in the notation the articulation corresponding to certain special effects. The default tie orientation of pull-offs and hammers can be reversed and the tie displayed as a dotted line via the Note Attributes dialog.
The Legato function allows you to insert an arbitrary arch linking a note to another.
TablEdit allows you to define, very precisely, the vertical position at which rests are to be displayed in the stave. Simply place the cursor on the rest in the tablature and use [+/-] to adjust its position.
If you wish a manually inserted rest to appear only in the stave and not in the tablature, simply select the rest and press [T]. The hidden rest remains displayed in the tablature as grayed but will not be printed. To prevent a rest from being tied to the preceding or following note, select it and press [X]. To remove the stem of a rest select it and press [ ! ].
All possible attributes for a given rest can be defined in the Note -> Attributes dialog box
Horizontal note spacing - in certain cases (appoggiaturas, alterations fingering indications in the notation) it may prove useful to be able to vary the distance between one note and the note following it. To this end, [W] inserts an offset marker ![]() whose value can be increased or decreased by use of [<] or [>]. You can also use the "Format" dialog when the cursor is positioned on such a marker.
whose value can be increased or decreased by use of [<] or [>]. You can also use the "Format" dialog when the cursor is positioned on such a marker.
Clefs and Middle C
See Instrument - Clef.
This feature allows you to place a standard barré indicator above the either the tablature or the standard notation. The placement of the indicator is controlled by the selection made in the Text Manager dialog.
To display such an indication:
Create a text event ([![]() ]+[T]).
]+[T]).
| • | enter the text you wish to display (for example the Roman numeral VIII) in the text entry field. In order to indicate a partial barré simply write 1/3, 1/2 or 2/3 before the fret indicator to indicate a two, three or four string partial barré. If the barre chord macro starts with a space, the barre chord line is offset to the right. |
| • | after your text (no space in between) type the formula %barchord: |
| • | type the extent of the barré as expressed in 1/16th notes, e.g. :32 (16x2) indicating the equivalent of two measures of 4/4 time. On the opposite, :0 allows you to insert a short barré that covers only the position. |
| • | when you then press [Enter] the formula is converted into a correct barré indicator. The formula VII%barchord:32 used for our example results in the text VII followed by a line 32 1/16th notes in length ending in a downward bend of the line (terminator). |
Note: The example above is based on 4/4 time and it's assumed that the indicator is to be placed at the very beginning of the first measure. Such indicators can, of course, begin or end at any point in a measure. All that is required is that you re-calculate the final value of the formula to indicate the correct extension as measured in 1/16th notes.
To indicate a barre greater than 32 1/16th notes, type your text (VII in the above example) followed by %barchord:. This will eliminate the final downturn of the line which will be limited to the length of the measure into which it is inserted. The line can then be extended by inserting a text event using only the %barchord: portion of the formula at the beginning of each subsequent measure (assuming a 4/4 time signature). The final terminator is created by defining the breaking point in the last text event e.g. %barchord:8 would add the terminator at the midpoint of the final measure (8 1/16th notes into the measure).
You can reverse the direction (up instead of down) of the terminator by using the formula %hbar.
Replacing the colon in the formula with a period/full stop (e.g. VII%barchord.32) will cause TablEdit to display a dotted, rather than solid, line.
See also: http://el-kay.com/tabledit/en/ShapingNotes.htm & http://el-kay.com/tabledit/en/MiddleVoice.htm